|
|
 |
 Part 2: Surface Preparation for Pavement Marking
|
|
|
Surface Preparation
As with any job, including seal coating, crack filling and line striping, your surface must be properly prepared before any material goes down on the pavement. Follow these steps to prepare your surface for line painting:
- Sweep, broom, or blow off all surface debris from your project area. Blowers aid in minimizing prep time, which can often be a time consuming aspect. See AK Billy Goat Blower.
- Section off desired area with your 18 inch orange cones (whether you are completing your job during daytime hours or at night, it is wise to set up orange cones to redirect any traffic flow coming in or out of your work area).
- Have retractable chalk string line ready.
|
|
|
Marking Your Stalls
Each stall should look like the following and consist of roughly the same sizes:
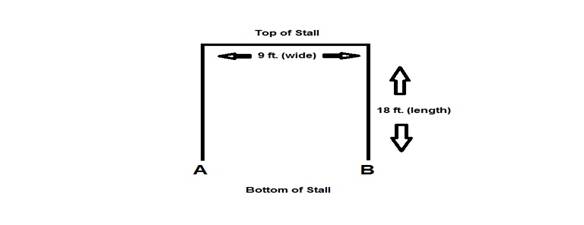
There are two types of jobs that fall into this category of marking your stalls:
- Tracing over existing lines
- New pattern and layout
This next section will outline how to mark your stalls accurately, with proper dimensions for standard parking lots. You will need to do this for every pavement marking job that includes parking stalls.
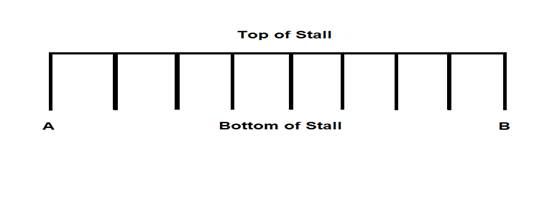
Marking your stalls is necessary in order for you to see where to start and where to finish when painting your lines. You will begin marking your T’s at the end of each stall line. Follow these next steps in order to mark your stalls correctly for pavement marking:
- Hook your 260 ft long rope to the bottom of your cart. (Cart is at Point A)
- Walk the rope from point A to point B.
- Pull your rope tight.
- Secure the end of the rope at point B, walk back towards point A marking the letter T at the end of each stall line. The letter T indicates the direction you will be painting.
Note: You will notice that the stall lines are not all of equal length. As long as you make your T markings directly beside your rope your new lines will be of equal length.
Once your T marks are in place at the bottom of your stalls, you can begin your vertical chalk lines. Follow these steps in order to do this correctly:
- Starting from Point A, walk with your Chalk String Line to Point C.
- At Point C snap your Chalk String Line against the ground, making a straight line from Point A to Point C.
 |
- Continue down the grid, at 9 ft. intervals. Using your Chalk String Line to mark each stall line between C and D.
- When you have completed this task you will have a chalk outline grid of where you need to line up your spray gun, which is attached to your Line Striping machine.
| |
|
|
|
| |
Contents Copyright © LIL. All Rights Reserved |
|
|
|


